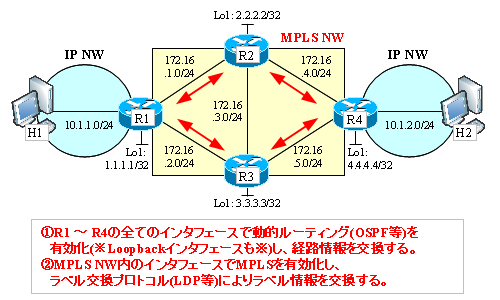
ラベル交換の前に、各 LSR は Address Message により、自分のインタフェースのIPアドレスの情報を送ります。 理由は前述しました。
Cisco でこの結果を見るには、以下コマンドを使います。
# show mpls ldp neighbor次に、各 LSR は Label Mapping Message により、自分がローカルに割り当てたラベル (Local Label) を LDP ピアに伝達します。
この Label Mapping Message により受け取ったラベルを Remote Label と言います。
この情報を元に、各 LSR は LIB (Label Information Base) を構成します。
Cisco で LIB を見るには、以下コマンドを使います。
# show mpls ldp bindingsFEC は宛先 NW アドレスや ToS 等の値、もしくはそれらの組合せであると前述しましたが、RFC3036 (3.4.1. FEC TLV) で記されている FEC の種類は、Prefix (宛先 NW アドレス) と Host Address の 2 種類のみです。
また、ラベル領域は 20 bit であることから分かる通り、利用できるラベルは [0 - 2^20] の範囲ですが、LDP で通常の FEC で利用できるラベル番号は 16 からになります。
0 - 15 は以下のように割り当てられています。
0: IPv4 Explicit Null Label
1: Router Alert Label
2: IPv6 Explicit Null Label
3: Implicit Null Label
4 - 15: Reserved
1: Router Alert Label
2: IPv6 Explicit Null Label
3: Implicit Null Label
4 - 15: Reserved
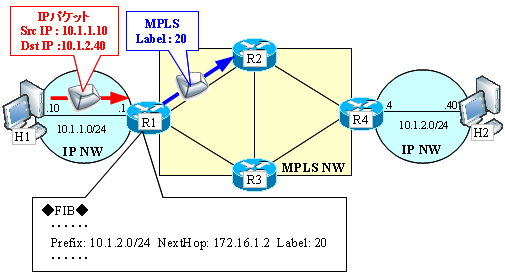
図の R1 において、直結 NW には、Label 3 (Implicit Null Label) が使われています。これは PHP (Penultimate Hop Poppoing) と呼ばれる仕組みです。詳細は後ほど説明します。
例として、R1 の LIB を見てみます。
| FEC (Prefix) | Local/Remote | Label | LSR (LDP ID) |
|---|---|---|---|
| 10.1.1.0/24 | Local | 3 | - |
| Remote | 17 | 2.2.2.2:0 | |
| Remote | 20 | 3.3.3.3:0 | |
| 10.1.2.0/24 | Local | 22 | - |
| Remote | 20 | 2.2.2.2:0 | |
| Remote | 22 | 3.3.3.3:0 | |
| 172.16.1.0/24 | Local | 3 | - |
| Remote | 3 | 2.2.2.2:0 | |
| Remote | 17 | 3.3.3.3:0 | |
| 172.16.2.0/24 | Local | 3 | - |
| Remote | 18 | 2.2.2.2:0 | |
| Remote | 3 | 3.3.3.3:0 | |
| 172.16.3.0/24 | Local | 17 | - |
| Remote | 3 | 2.2.2.2:0 | |
| Remote | 3 | 3.3.3.3:0 | |
| 172.16.4.0/24 | Local | 18 | - |
| Remote | 3 | 2.2.2.2:0 | |
| Remote | 18 | 3.3.3.3:0 | |
| 1.1.1.1/32 | Local | 3 | - |
| Remote | 16 | 2.2.2.2:0 | |
| Remote | 19 | 3.3.3.3:0 | |
| 2.2.2.2/32 | Local | 16 | - |
| Remote | 3 | 2.2.2.2:0 | |
| Remote | 16 | 3.3.3.3:0 | |
| 3.3.3.3/32 | Local | 19 | - |
| Remote | 22 | 2.2.2.2:0 | |
| Remote | 3 | 3.3.3.3:0 | |
| 4.4.4.4/32 | Local | 21 | - |
| Remote | 19 | 2.2.2.2:0 | |
| Remote | 21 | 3.3.3.3:0 |


コメント