前回のあらすじ

今回やりたいこと
Elasticsearch において WebAPI への認証が無い状態、https 化もしていない状態のため、これを有効化します。また、Kibana も https 化して Elasticsearch で作ったユーザで認証させます。また、Logstash から Elasticsearch への接続を https に対応させます。
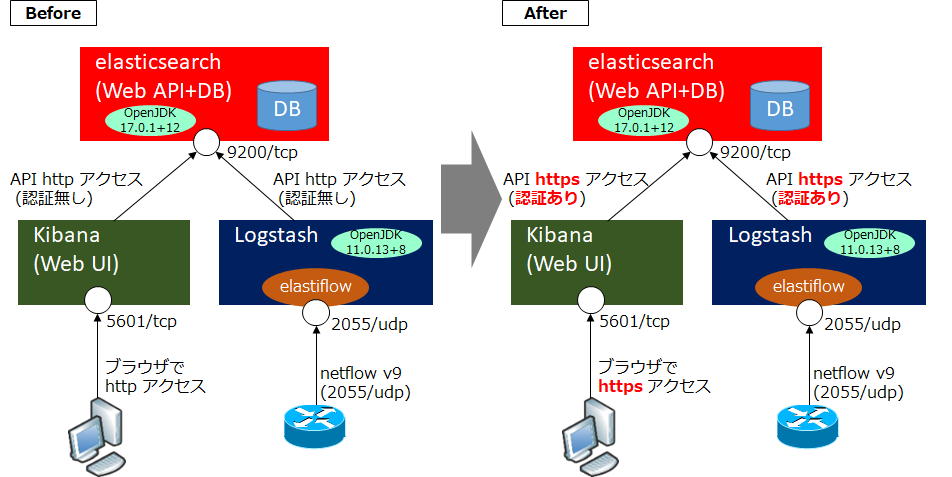
今回の例では Elasticsearch は同一サーバ内の Kibana と Logstash から接続しますが、ローカルホスト内なので本来的には https にする必要はありませんが、ログイン後のダッシュボードに「データが保護されていません」と表示されてしまうので、その対処として実施します。
Elasticsearch の認証有効化および https 化
まず ELK サービスを 3 つとも停止します。
[root@localhost ~]# systemctl stop elasticsearch kibana logstash次に、hosts ファイルの 127.0.0.1 のエントリに elastiflow.example.com を追記します。これは今回は同一サーバ内でアクセスするためです。
[root@localhost ~]# vi /etc/hosts

127.0.0.1   localhost localhost.localdomain localhost4 localhost4.localdomain4 elastiflow.example.com
~~~
次に https のための鍵を作成します。instance.yml を新規作成し、最低限の情報を書き込みます。鍵は Elasticsearch と Kibana で共用とします。
[root@localhost ~]# mkdir tmp
[root@localhost ~]# cd tmp
[root@localhost tmp]# vi instance.yml

instances:
  - name: 'node-1'
    dns: [ 'elastiflow.example.com' ]
[root@localhost ~]# /usr/share/elasticsearch/bin/elasticsearch-certutil cert --keep-ca-key --pem --in ~/tmp/instance.yml --out ~/tmp/certs.zip
[root@localhost ~]# unzip certs.zip -d ./certs
[root@localhost ~]# mkdir /etc/elasticsearch/certs
[root@localhost ~]# cp ~/tmp/certs/ca/* /etc/elasticsearch/certs/
[root@localhost ~]# cp ~/tmp/certs/node-1/* /etc/elasticsearch/certs/
次に、elasticsearch の設定ファイルで https を有効化し、鍵ファイルを読み込むようにします。最初の2行は編集、3行目以降は追記です。
[root@localhost ~]# vi /etc/elasticsearch/elasticsearch.yml

node.name: node-1
network.host: elastiflow.example.com
xpack.security.enabled: true
xpack.security.http.ssl.enabled: true
xpack.security.transport.ssl.enabled: true
xpack.security.http.ssl.key: certs/node-1.key
xpack.security.http.ssl.certificate: certs/node-1.crt
xpack.security.http.ssl.certificate_authorities: certs/ca.crt
xpack.security.transport.ssl.key: certs/node-1.key
xpack.security.transport.ssl.certificate: certs/node-1.crt
xpack.security.transport.ssl.certificate_authorities: certs/ca.crt
discovery.seed_hosts: [ "elastiflow.example.com" ]
次に、elasticsearch サービスを起動し、さっそく https でアクセスします。この時点ではWebAPI への認証はありませんが、このコマンド実行することでユーザとパスワードが自動生成され、認証が有効化されます。
[root@localhost ~]# systemctl start elasticsearch
[root@localhost ~]# /usr/share/elasticsearch/bin/elasticsearch-setup-passwords auto -url "https://elastiflow.example.com:9200"

	Please confirm that you would like to continue [y/N]y

Changed password for user apm_system
PASSWORD apm_system = CzDWB4muSLDTShWCB1av

Changed password for user kibana_system
PASSWORD kibana_system = 5HYQTeiUTdeQjhZob0sm

Changed password for user kibana
PASSWORD kibana = 5HYQTeiUTdeQjhZob0sm

Changed password for user logstash_system
PASSWORD logstash_system = qEUfMuUvcIBIT5HfXWbz

Changed password for user beats_system
PASSWORD beats_system = TOheTdKUYWa6b5XaX06F

Changed password for user remote_monitoring_user
PASSWORD remote_monitoring_user = cmL2IsRinh9eKguc3i89

Changed password for user elastic
PASSWORD elastic = Fmtib0iTiS0lsaHyYb87
さっそく認証付きでアクセスしてみます。以下コマンドにて elastic のパスワード (↑で自動生成された elastic のパスワード) を入力すると以下のように表示されます。なお、このコマンドは SELinux が Enforcing になっているとうまく動きません。
[root@localhost ~]# curl -k --cacert /tmp/certs/ca/ca.crt -u elastic 'https://elastiflow.example.com:9200/_cat/nodes?v'
	Enter host password for user 'elastic':

	ip        heap.percent ram.percent cpu load_1m load_5m load_15m node.role   master name
	127.0.0.1            9          97   6    0.13    0.39     0.43 cdfhilmrstw *      node-1
Kibana の https 化
まずは先ほど作った鍵・証明書をコピーします。
[root@localhost ~]# mkdir -p /etc/kibana/config/certs
[root@localhost ~]# cp -p /etc/elasticsearch/certs/* /etc/kibana/config/certs/
[root@localhost ~]# ls /etc/kibana/config/certs/
ca.crt  ca.key  node-1.crt  node-1.key
次にkibana.yml を編集して https 化に対応させます。最後の 1 行はダッシュボードの警告「構成がありません server.publicBaseUrlが見つかりません」への対処になります。
[root@localhost ~]# vi /etc/kibana/kibana.yml

	elasticsearch.hosts: ["https://elastiflow.example.com:9200"]
	elasticsearch.username: "kibana_system"
	elasticsearch.password: "GtqTIPdi8BWIDJTCi8ge"

	server.ssl.enabled: true
	server.ssl.certificate: /etc/kibana/config/certs/node-1.crt
	server.ssl.key: /etc/kibana/config/certs/node-1.key

	elasticsearch.ssl.certificateAuthorities: [ "/etc/kibana/config/certs/ca.crt" ]
	elasticsearch.ssl.verificationMode: none

	server.publicBaseUrl: "https://elastiflow.example.com:5601"
サービスを起動します。
[root@localhost ~]# systemctl start kibanaブラウザで Kibana へアクセスすると認証画面が出るので、ユーザ elastic とパスワードを入力するとログインできます。
Logstash の設定変更
ハマりポイントでした。logstash の変更は "etc/logstash/elastiflow/conf.d" の配下の "30_output_10_single.logstash.conf" で実施するものと思っていましたが、、、ここを変えても変わりませんでした。/var/log/logstash/logstash-plain.log に以下のように http でアクセスするエラーが出てきます。
[2021-12-16T22:29:05,569][WARN ][org.logstash.execution.ShutdownWatcherExt] {"inflight_count"=>0, "stalling_threads_info"=>{["LogStash::Filters::Mutate", {"remove_field"=>["[metadata]"], "id"=>"b19f0d2af7b01d73b329f8d182a0702e955ab194f424a82df542fe90c6d60639"}]=>[{"thread_id"=>58, "name"=>"[main]>worker0", "current_call"=>"[...]/vendor/bundle/jruby/2.5.0/gems/stud-0.0.23/lib/stud/interval.rb:95:in `sleep'"}, {"thread_id"=>59, "name"=>"[main]>worker1", "current_call"=>"[...]/vendor/bundle/jruby/2.5.0/gems/stud-0.0.23/lib/stud/interval.rb:95:in `sleep'"}, {"thread_id"=>60, "name"=>"[main]>worker2", "current_call"=>"[...]/vendor/bundle/jruby/2.5.0/gems/stud-0.0.23/lib/stud/interval.rb:95:in `sleep'"}, {"thread_id"=>61, "name"=>"[main]>worker3", "current_call"=>"[...]/vendor/bundle/jruby/2.5.0/gems/stud-0.0.23/lib/stud/interval.rb:95:in `sleep'"}]}}
[2021-12-16T22:29:05,652][WARN ][logstash.outputs.elasticsearch][main] Attempted to resurrect connection to dead ES instance, but got an error {:url=>"http://elastic:xxxxxx@127.0.0.1:9200/", :exception=>LogStash::Outputs::ElasticSearch::HttpClient::Pool::HostUnreachableError, :message=>"Elasticsearch Unreachable: [http://elastic:xxxxxx@127.0.0.1:9200/][Manticore::ClientProtocolException] 127.0.0.1:9200 failed to respond"}
結果としては systemd 側の環境変数を実施します。
[root@localhost ~]# vi /etc/systemd/system/logstash.service.d/elastiflow.conf

Environment="ELASTIFLOW_ES_USER=elastic"
Environment="ELASTIFLOW_ES_PASSWD=Fmtib0iTiS0lsaHyYb87"
Environment="ELASTIFLOW_ES_SSL_ENABLE=true"
この後は system daemon-reload をして logstash を起動します。
[root@localhost ~]# systemctl daemon-reload
[root@localhost ~]# systemctl start logstash
これで完成です。

コメント